Honeywell Security Panel Manual: A Comprehensive Guide
Honeywell Ademco Vista 20P panels are reliable for residential and commercial security, supporting wired/wireless sensors, partitions, and fire/burglary protection.
Honeywell has long been a trusted leader in security solutions, providing innovative systems for homes and businesses alike. Their panels, like the Vista 20P, are renowned for their dependability and adaptability. These systems offer comprehensive protection, encompassing burglary, fire, and life safety.
A key strength of Honeywell systems lies in their ability to integrate both hardwired and wireless sensors, offering flexibility during installation and expansion. Multiple partitions allow for customized security zones, ideal for larger properties or businesses needing differentiated access control. Furthermore, Honeywell systems are designed to be user-friendly, with intuitive keypads and programming options. Understanding your Honeywell panel is crucial for maximizing its protective capabilities and ensuring peace of mind.
Understanding the Vista 20P Panel
The Honeywell Ademco Vista 20P is a widely utilized alarm control panel, serving as the central hub for your security system. It’s designed for both residential and light commercial applications, offering robust protection against various threats. The panel communicates with sensors – both wired and wireless – to detect intrusions, fire, and other emergencies.
Its flexibility allows for customization, supporting multiple zones and partitions to tailor security to specific needs. The Vista 20P also features a built-in keypad for arming, disarming, and programming the system. Understanding the panel’s components, including the battery backup and communication modules, is essential for proper operation and maintenance. Proper installation and configuration by a qualified technician are highly recommended to ensure optimal performance.
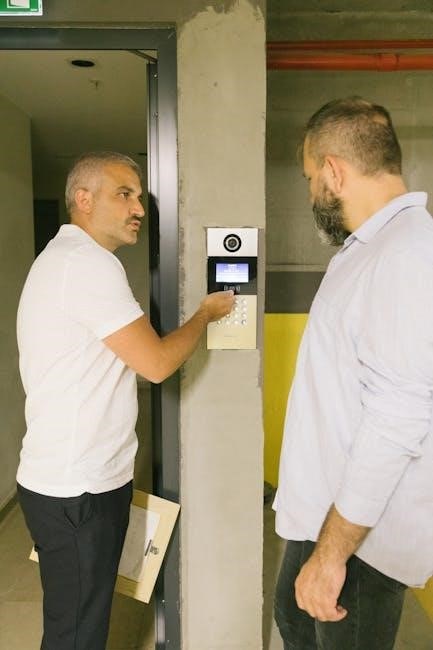
Keypad Functions and Navigation
The keypad serves as your primary interface for interacting with the Honeywell Vista 20P security system. Basic functions include arming and disarming the system, entering user codes, and accessing system information. Alpha keypads offer expanded features, such as zone descriptors and self-help messages accessible by holding a key for five seconds.
Navigation typically involves using directional arrows and the “Enter” key to confirm selections. The keypad display provides status updates, including system arming status, zone faults, and trouble alerts. Familiarize yourself with the icons and messages displayed to quickly understand the system’s state. Remember that your installer assigned a master code for full system control, alongside individual user codes for authorized access.
Arming and Disarming the System
Honeywell Vista 20P systems offer multiple arming modes to suit different needs. Away arming secures the entire premises when no one is home, while Stay arming protects the perimeter, allowing movement inside. Night arming is a customized mode often used during sleep, potentially arming specific zones.

To arm the system, enter your valid user code followed by the desired arming mode key. Disarming requires entering your user code when prompted by the system. A scheduled report can be triggered if the system isn’t disarmed by a set time, useful for monitoring children arriving home. Always ensure all doors and windows are closed before arming to prevent false alarms.
Stay Arming Mode
Stay arming on a Honeywell Vista 20P system provides perimeter protection while allowing movement within the secured premises. This mode is ideal when someone remains at home. Typically, it arms door and window sensors, but bypasses interior motion detectors. This prevents false alarms caused by occupants moving around inside.
To activate Stay arming, enter your user code followed by the designated “Stay” key on the keypad. The system will initiate a countdown, allowing time to exit the protected area. Once armed, any breach of a perimeter zone will trigger an alarm. Remember to confirm all exterior doors and windows are secure before arming in Stay mode for optimal protection.
Away Arming Mode
Away arming on a Honeywell Vista 20P system provides complete protection of the premises when no one is home. This mode activates all sensors, including perimeter and interior motion detectors. It’s designed to detect any intrusion attempt, offering the highest level of security.
To arm the system in Away mode, enter your user code followed by the designated “Away” key on the keypad. A countdown timer will begin, providing an exit delay. Ensure all doors and windows are securely closed before the countdown ends. Any sensor activation during Away mode will immediately trigger an alarm and potentially notify a monitoring center, if connected. This mode is crucial for safeguarding your property during extended absences.
Night Arming Mode
Night arming on a Honeywell Vista 20P system offers a balanced security approach for nighttime use. This mode typically arms perimeter sensors – doors and windows – while intentionally bypassing interior motion detectors, allowing occupants to move freely inside the home. It’s ideal for when you are asleep or present within the residence.
To activate Night mode, enter your user code followed by the designated “Night” key on the keypad. Like other modes, an exit delay will initiate, ensuring all designated areas are secured. If a perimeter door or window is opened while armed in Night mode, the alarm will trigger. This provides protection against external threats while minimizing false alarms caused by nighttime movement within the house.
Programming the System
Programming a Honeywell Vista 20P panel allows customization of security settings to fit individual needs. Accessing programming mode requires the master code, assigned by the installer, which grants full control over system functions. Additional user codes can be created for family members or trusted individuals, each with unique access privileges.
To enter programming mode, typically you’ll input the master code followed by a designated programming key (often * or #). From there, you can modify zone definitions (sensors), adjust entry/exit delays, configure alarm responses, and set up schedules for automated arming/disarming. Careful programming ensures optimal system performance and minimizes false alarms. Always document changes for future reference and consult your installer for complex configurations.
Entering Programming Mode
To initiate programming on a Honeywell Home Wireless system, ensure the panel is in Standby (Disarmed) mode. Press the “Settings” button located on the control panel. Subsequently, enter your unique User Access Code. Alternatively, for systems equipped with tag readers, simply wave your registered Tag in front of the blue light on the Control Panel.
For Vista 20P systems, entering programming typically involves keying in the master code followed by a specific key, often denoted by an asterisk (*) or pound sign (#). The system will then display a prompt confirming entry into programming mode. Remember that the master code is assigned by your installer and is crucial for accessing and modifying system settings. Always exercise caution and document any changes made during programming.
Master Code and User Codes
Your Honeywell system utilizes a hierarchical code structure for security. The installer assigns a unique master code granting full access to all system functions, including programming and configuration changes. Safeguard this code diligently, as unauthorized access could compromise your system’s integrity.
Beyond the master code, the VISTA-20P Series supports up to 47 individual user codes. These codes allow designated individuals to arm, disarm, and manage specific system features without requiring the master code. Assigning unique codes enhances accountability and control. Remember to choose codes that are not easily guessable, such as birthdays or addresses, to maintain a robust security posture. Regularly review and update user codes as needed.
Zone Programming (Sensors)
Zone programming defines how the Honeywell panel interprets signals from each sensor – doors, windows, motion detectors, and more. Each sensor is assigned to a specific zone, allowing the system to pinpoint the location of an alarm event. Proper zone programming is crucial for accurate monitoring and efficient response.
During installation, your security professional configures each zone with specific attributes, such as entry/exit delay, instant alarm, or 24-hour monitoring. These settings dictate how the system reacts to a triggered sensor. Understanding zone programming allows for customization based on your property’s layout and security needs. Incorrect zone configurations can lead to false alarms or compromised protection, so professional setup is recommended. Zone descriptors can be accessed via the keypad.
System Features and Settings
Honeywell security panels offer a range of features beyond basic arming and disarming, enhancing both convenience and security. Scheduling and timers allow automated arming/disarming based on pre-set times, ideal for routines. Pager reports and notifications keep you informed of system events, like alarms or low batteries, directly to your pager or mobile device.
Panic keys, programmable for immediate emergency response, provide a quick way to signal distress. Alpha keypads offer self-help messages and zone descriptors when holding a key for five seconds. These features, alongside customizable settings, allow tailoring the system to individual needs. Proper configuration, often performed by a qualified installer, maximizes the panel’s capabilities and ensures optimal performance.
Scheduling and Timers
Honeywell panels allow users to program schedules that automate system arming and disarming, enhancing convenience and security. Event 03, specifically, triggers a pager report if the system isn’t disarmed by a designated time – useful for monitoring children arriving home from school, for example. This feature provides peace of mind by alerting you to potential issues.
These schedules operate on a 24-hour clock, allowing precise control over when the system transitions between armed and disarmed states. Timers can be set for specific days of the week, accommodating varying routines. Properly configured schedules reduce the need for manual operation, improving overall system usability and responsiveness to your lifestyle.
Pager Reports and Notifications

Honeywell security systems can be configured to send reports and notifications via pager, providing immediate alerts about system events. These reports can be triggered by various occurrences, including alarms, low battery conditions, or system faults. Scheduling plays a crucial role; a pager report can be initiated if the system isn’t disarmed by a pre-set time, offering monitoring capabilities for situations like ensuring a child arrives home safely.
The system’s ability to deliver timely notifications enhances response times to potential threats or malfunctions. Proper setup, often handled by a qualified installer, ensures that the correct events generate alerts and that the pager receives the information reliably. This feature provides an extra layer of security and peace of mind for homeowners and business owners.
Panic Keys and Emergency Functions
Honeywell security panels allow for the programming of dedicated keys as “panic keys,” providing a discreet method to signal an emergency. When activated, these keys immediately transmit an alarm signal to the monitoring center, requesting urgent assistance – police, fire, or medical services, depending on the programmed response. These functions are crucial for quickly summoning help during a crisis.
Systems with Alpha keypads offer additional features; holding a key for five seconds can reveal self-help messages related to that key’s function or provide zone descriptors. Your installer configures these settings. Commercial systems benefit from this functionality, enhancing user understanding and system operation. Always consult your installer for specific details regarding panic key programming and emergency function setup to ensure optimal performance and responsiveness.
Troubleshooting Common Issues
Honeywell security systems, while reliable, can occasionally present issues. Common problems include low battery alerts, often indicated on the keypad, requiring immediate battery replacement in sensors or the control panel itself. False alarms can occur due to improperly installed sensors, environmental factors, or user error; ensure sensors are securely mounted and adjusted correctly. Regularly test your system to identify and address potential issues proactively.

Communication failures, preventing signal transmission to the monitoring center, can stem from a disconnected phone line or internet outage. Verify your communication path and contact your provider if necessary. If issues persist, consult the system’s manual or contact a qualified technician for assistance. Addressing these common problems promptly ensures continued security and peace of mind.
Low Battery Alerts
Honeywell systems will alert you to low battery levels in sensors or the control panel via a message displayed on the keypad. These alerts are crucial as diminished battery power can compromise system functionality and security. Promptly address these warnings by replacing the batteries in the affected devices – typically AA or AAA batteries, depending on the sensor type.
Ignoring low battery alerts can lead to false alarms or a complete system failure during an emergency. Regularly scheduled battery checks, even before an alert appears, are recommended as preventative maintenance. Refer to your system’s manual for specific instructions on locating and replacing batteries in each sensor type. Maintaining adequate battery power ensures reliable protection.
False Alarm Prevention
Honeywell systems, while reliable, can experience false alarms if not properly maintained and used. To minimize these occurrences, ensure all doors and windows are securely closed before arming the system. Regularly test sensors to confirm proper functionality and adjust sensitivity if needed. Avoid placing sensors near heat sources or areas with significant air movement, which can trigger false detections.
Educate all users on proper arming and disarming procedures, including entry/exit delays. Review recent alarm history to identify potential causes and address them. Consider utilizing features like zone bypass for problematic sensors during specific times. Promptly address any sensor malfunctions. Reducing false alarms protects your property and avoids unnecessary emergency response dispatches.

Communication Failures
Honeywell security panels rely on consistent communication with the monitoring center. Communication failures can occur due to several reasons, including a disconnected phone line (for landline systems), internet outages (for IP/cellular systems), or issues with the radio signal (for wireless systems). The panel will typically display a “Communication Failure” or similar message when this happens.
Verify your phone line connection or internet service is active. For wireless systems, ensure the antenna is properly connected and positioned. Contact your monitoring company to report the failure and confirm they are not receiving signals. If using cellular communication, ensure sufficient signal strength. Regularly test the communication link with the monitoring center to proactively identify and resolve potential issues, ensuring reliable alarm reporting.
Advanced System Configuration
Honeywell Vista panels offer advanced configuration options for tailored security. Partitioning divides the system into independent zones, allowing separate arming/disarming and user access control – ideal for multi-tenant properties or distinct areas within a home. Wireless sensor integration expands system flexibility, enabling easy addition of sensors without wiring, utilizing RF communication.
Fire alarm system integration allows connection of smoke and heat detectors, providing comprehensive fire protection monitored alongside burglary alarms. Advanced programming requires a thorough understanding of the panel’s capabilities and is best handled by a qualified installer. Incorrect configuration can compromise system functionality, so professional assistance is highly recommended for these advanced features.
Partitioning the System
Partitioning on a Honeywell Vista panel divides the security system into separate, independently controlled zones. Each partition functions as its own mini-system, with unique arming/disarming schedules and user access codes. This is particularly useful for larger properties, businesses with multiple departments, or homes with separate living areas.
Each partition can have its own sensors and keypads, allowing specific areas to be secured while others remain accessible. A user authorized for one partition may not have access to others, enhancing security and control. Programming partitions requires careful consideration of the property layout and security needs, and is typically performed by a qualified installer to ensure proper functionality and avoid unintended access.
Wireless Sensor Integration
Honeywell Vista 20P panels readily integrate with a wide range of wireless sensors, offering flexibility and ease of installation, especially in existing structures where wiring is difficult or impractical. These sensors communicate via radio frequency (RF) signals, eliminating the need for physical connections to the control panel.

Common wireless devices include door/window contacts, motion detectors, and glass break sensors. Successful integration requires enrolling each sensor with the panel, a process that establishes a unique communication link. Signal strength and potential interference must be considered during placement to ensure reliable operation. Battery life is a crucial factor with wireless sensors, requiring periodic checks and replacements to maintain system integrity.

Fire Alarm System Integration
Honeywell Vista 20P panels can be integrated with fire alarm systems, providing comprehensive life safety protection alongside burglary and security features. This integration typically involves connecting smoke detectors, heat detectors, and manual pull stations to dedicated fire alarm zones on the panel.
Upon activation of a fire device, the panel initiates a pre-programmed response, which may include sounding local alarms, notifying a central monitoring station, and potentially activating auxiliary devices like door releases. Proper configuration is critical to ensure the fire alarm system functions correctly and meets local fire codes. Regular testing of all fire alarm devices and the panel’s response is essential for maintaining a reliable system.
Honeywell Home Wireless System Programming
To enter Programming Mode on a Honeywell Home Wireless system, ensure the system is in Standby (Disarmed). Press the Settings button on the control panel. Then, enter your User Access Code or wave your registered Tag near the blue light on the panel. This initiates the programming sequence, allowing for customization of various system settings.
Wireless system programming enables adjustments to sensor configurations, user codes, and notification preferences. Users can add or delete sensors, modify zone names, and configure communication settings. Careful attention to the programming steps is crucial for optimal system performance and security. Refer to the complete Honeywell Home Wireless system guide for detailed instructions and advanced programming options.
Local Programming Guide (PROA7PLUS/PROA7 Series)
The PROA7PLUS/PROA7 Series offers a Local Programming option, enabling operation as a standalone system without central station monitoring or AN360 integration. Selecting Local Alarm Mode bypasses communication requirements, ideal for users prioritizing self-monitoring and local alerts. This mode simplifies setup and eliminates monthly monitoring fees.
To activate Local Alarm Mode, access the system’s programming menu and navigate to the communication settings. Choose the option to disable central station reporting. Confirm the selection to finalize the change. Remember that in Local Alarm Mode, the system will only trigger local sirens and notifications; no alerts will be sent to a monitoring center. Ensure this aligns with your security needs.
Self-Help Messages and Keypad Features
Honeywell security keypads, particularly those with Alpha displays, offer valuable self-help messages to guide users. Holding a specific key for approximately five seconds often reveals information about that key’s function or provides zone descriptors, aiding in system understanding. This feature enhances usability and reduces reliance on external documentation.
These self-help prompts are designed to assist with troubleshooting and system navigation. They can clarify zone assignments, explain error messages, or provide instructions for common tasks. However, it’s important to note that this functionality may not be available on all keypad models. Check with your system installer to confirm if your keypad supports these features and to learn about specific key assignments.